Hi~大家好,出来创业快3个月了,一切还不错,前一段时间用了业余时间搞了个问答类网站YQMA(http://yqma.net).想做中国的stackoverflow,哈哈,只是YY下,希望大家多多支持!
好了,今天给大家分享的是Path菜单的简单实现,可以支持自定义方向(左上,右上,右下,左下),并且可以自定义菜单的个数,难点就是菜单的摆放位置(动态设置margin),还有动画的实现,其实动画只是简单用了个TranslateAnimation,N个菜单一起移动的时候感觉很cool~
这里也用到了自定义标签,这里不懂的童鞋可以看我 Android高手进阶教程(四)之----Android 中自定义属性(attr.xml,TypedArray)的使用! 这篇文章.好了废话不多说了,
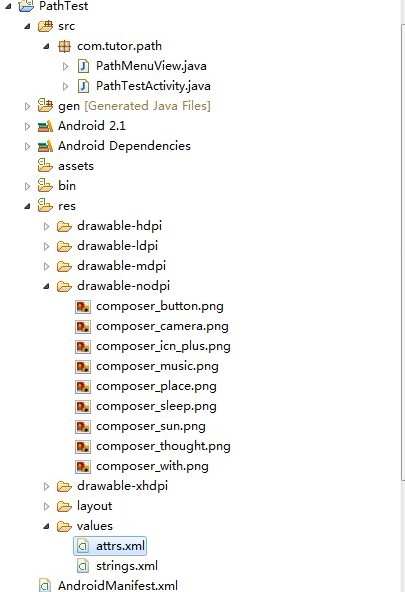
首先创建一个android工程命名为PathTest.目录结构如下图:
第二步:在values文件夹下新建一个attrs.xml文件,代码如下:
<?xml version="1.0" encoding="utf-8"?>
<resources>
    <declare-styleable name="PathMenuView">
        <attr name="position">
            <enum name="left_top" value="0"></enum>
            <enum name="right_top" value="1"></enum>
            <enum name="right_bottom" value="2"></enum>
            <enum name="left_bottom" value="3"></enum>
        </attr>
    </declare-styleable>
</resources>
第三步:新建一个PathMenuView.java这个就是我们自定义的Path菜单控件,代码如下:
package com.tutor.path;

import android.content.Context;
import android.content.res.TypedArray;
import android.util.AttributeSet;
import android.view.Gravity;
import android.view.View;
import android.view.ViewGroup;
import android.view.animation.Animation;
import android.view.animation.AnticipateInterpolator;
import android.view.animation.OvershootInterpolator;
import android.view.animation.TranslateAnimation;
import android.widget.FrameLayout;
import android.widget.ImageView;


/**
 * @author frankiewei.
 * 超级仿path菜单
 * position定义菜单的位置,目前支持:左上;右上;右下;左下四个方向。
 * menuResIds定义出现的菜单的资源ID
 */
public class PathMenuView extends FrameLayout {

	private static final int LEFT_TOP = 0;

	private static final int RIGHT_TOP = 1;

	private static final int RIGHT_BOTTOM = 2;

	private static final int LEFT_BOTTOM = 3;


	/**
	 * 默认的位置是在右下角.
	 */
	private int position = 3;

	/**
	 * 那个圆形菜单.
	 */
	private ImageView mHome;

	/**
	 * 上下文.
	 */
	private Context mContext;


	/**
	 * 设备的宽度.
	 */
	private int mWIDTH = 0;

	/**
	 * 设备的高度.
	 */
	private int mHEIGHT = 0;

	/**
	 * 设备的density.
	 */
	private float mDensity;

	/**
	 * 菜单是否显示.
	 */
	private boolean bMenuShow;

	private static int	xOffset		= 15;
	private static int	yOffset		= -13;

	/**
	 * 菜单的资源个数.
	 */
	private int[] menuResIds = {R.drawable.composer_camera,R.drawable.composer_music,
			R.drawable.composer_sleep,R.drawable.composer_music,R.drawable.composer_place};


	public PathMenuView(Context context){
		super(context);
		setupViews();
	}

	public PathMenuView(Context context, AttributeSet attrs) {
		super(context, attrs);
		TypedArray a = context.obtainStyledAttributes(attrs,
                R.styleable.PathMenuView);

		position = a.getInt(R.styleable.PathMenuView_position,3);

		a.recycle();
		setupViews();
	}

	private void setupViews(){
		mContext = getContext();

		mHEIGHT = mContext.getResources().getDisplayMetrics().heightPixels;
		mWIDTH = mContext.getResources().getDisplayMetrics().widthPixels;
		mDensity = mContext.getResources().getDisplayMetrics().density;

		xOffset = (int) (10.667 * mDensity);
		yOffset = (int) (8.667 * mDensity);

		mHome = new ImageView(mContext);

		mHome.setImageResource(R.drawable.composer_button);
		mHome.setOnClickListener(listener);

		addView(mHome);

		LayoutParams mHomeparams = (FrameLayout.LayoutParams)mHome.getLayoutParams();
		mHomeparams.width = LayoutParams.WRAP_CONTENT;
		mHomeparams.height = LayoutParams.WRAP_CONTENT;

		switch (position) {
		case LEFT_TOP:
			mHomeparams.gravity = Gravity.LEFT | Gravity.TOP;
			for (int i = 0; i < menuResIds.length; i++) {

				int width_padding = mWIDTH / ((menuResIds.length - 1) * 2);
				int height_padding = mHEIGHT / ((menuResIds.length - 1) * 2);

				ImageView imageView = new ImageView(mContext);
				imageView.setImageResource(menuResIds[i]);
				addView(imageView);
				LayoutParams params = (FrameLayout.LayoutParams) imageView
						.getLayoutParams();
				params.width = LayoutParams.WRAP_CONTENT;
				params.height = LayoutParams.WRAP_CONTENT;
				params.leftMargin = mWIDTH / 2
						- ((menuResIds.length - i - 1) * width_padding);
				params.topMargin = mHEIGHT / 2 - i * height_padding;
				params.gravity = Gravity.LEFT | Gravity.TOP;
				imageView.setLayoutParams(params);

			}

			break;
		case RIGHT_TOP:
			mHomeparams.gravity = Gravity.RIGHT | Gravity.TOP;
			for (int i = 0; i < menuResIds.length; i++) {

				int width_padding = mWIDTH / ((menuResIds.length - 1) * 2);
				int height_padding = mHEIGHT / ((menuResIds.length - 1) * 2);

				ImageView imageView = new ImageView(mContext);
				imageView.setImageResource(menuResIds[i]);
				addView(imageView);
				LayoutParams params = (FrameLayout.LayoutParams) imageView
						.getLayoutParams();
				params.width = LayoutParams.WRAP_CONTENT;
				params.height = LayoutParams.WRAP_CONTENT;
				params.rightMargin = mWIDTH / 2
						- ((menuResIds.length - i - 1) * width_padding);
				params.topMargin = mHEIGHT / 2 - i * height_padding;
				params.gravity = Gravity.RIGHT | Gravity.TOP;
				imageView.setLayoutParams(params);

			}
			break;
		case RIGHT_BOTTOM:
			mHomeparams.gravity = Gravity.RIGHT | Gravity.BOTTOM;
			for (int i = 0; i < menuResIds.length; i++) {

				int width_padding = mWIDTH / ((menuResIds.length - 1) * 2);
				int height_padding = mHEIGHT / ((menuResIds.length - 1) * 2);

				ImageView imageView = new ImageView(mContext);
				imageView.setImageResource(menuResIds[i]);
				addView(imageView);
				LayoutParams params = (FrameLayout.LayoutParams) imageView
						.getLayoutParams();
				params.width = LayoutParams.WRAP_CONTENT;
				params.height = LayoutParams.WRAP_CONTENT;
				params.rightMargin = mWIDTH / 2
						- ((menuResIds.length - i - 1) * width_padding);
				params.bottomMargin = mHEIGHT / 2 - i * height_padding;
				params.gravity = Gravity.RIGHT | Gravity.BOTTOM;
				imageView.setLayoutParams(params);

			}
			break;
		case LEFT_BOTTOM:
			mHomeparams.gravity = Gravity.LEFT | Gravity.BOTTOM;
			for(int i = 0; i < menuResIds.length; i++){

				int width_padding = mWIDTH / ((menuResIds.length - 1) * 2);
				int height_padding = mHEIGHT / ((menuResIds.length -1) * 2);

			    ImageView imageView = new ImageView(mContext);
				imageView.setImageResource(menuResIds[i]);
				addView(imageView);
				LayoutParams params = (FrameLayout.LayoutParams)imageView.getLayoutParams();
				params.width = LayoutParams.WRAP_CONTENT;
				params.height = LayoutParams.WRAP_CONTENT;
				params.leftMargin = mWIDTH / 2 - ((menuResIds.length - i - 1) * width_padding);
				params.bottomMargin = mHEIGHT / 2 - i * height_padding;
				params.gravity = Gravity.LEFT | Gravity.BOTTOM;
				imageView.setLayoutParams(params);
			}
			break;
		default:
				break;
		}

		mHome.setLayoutParams(mHomeparams);
	}

	private OnClickListener listener = new OnClickListener() {

		public void onClick(View v) {
			if (!bMenuShow) {
				startAnimationIn(PathMenuView.this, 300);
			} else {
				startAnimationOut(PathMenuView.this, 300);
			}
			bMenuShow = !bMenuShow;
		}
	};


	/**
	 * 菜单隐藏动画.
	 *
	 * @param group
	 * @param duration
	 */
	private void startAnimationIn(ViewGroup group, int duration) {
		for (int i = 1; i < group.getChildCount(); i++) {
			ImageView imageview = (ImageView) group.getChildAt(i);
			imageview.setVisibility(0);
			MarginLayoutParams mlp = (MarginLayoutParams) imageview
					.getLayoutParams();


			Animation animation = null;


			switch (position) {
			case LEFT_TOP:
				animation = new TranslateAnimation(0F,-mlp.leftMargin+xOffset,0F,-mlp.topMargin + yOffset);
				break;
			case RIGHT_TOP:
				animation = new TranslateAnimation(mlp.rightMargin - xOffset,0F,-mlp.topMargin + yOffset,0F);
				break;
			case LEFT_BOTTOM:
				animation = new TranslateAnimation(0F, -mlp.leftMargin+ xOffset, 0F, -yOffset + mlp.bottomMargin);
				break;

			case RIGHT_BOTTOM:
				animation = new TranslateAnimation(mlp.rightMargin-xOffset,0F,-yOffset + mlp.bottomMargin, 0F);
				break;
			default:
				break;
			}

			animation.setFillAfter(true);
			animation.setDuration(duration);
			animation.setStartOffset((i * 100) / (-1 + group.getChildCount()));
			animation.setInterpolator(new OvershootInterpolator(2F));
			imageview.startAnimation(animation);

		}
	}

	/**
	 * 菜单显示动画.
	 *
	 * @param group
	 * @param duration
	 */
	private void startAnimationOut(ViewGroup group,int duration){
		for (int i = 1; i < group.getChildCount(); i++) {
			final ImageView imageview = (ImageView) group
					.getChildAt(i);
			MarginLayoutParams mlp = (MarginLayoutParams) imageview.getLayoutParams();

			Animation animation = null;

			switch (position) {
			case LEFT_TOP:
				animation = new TranslateAnimation(-mlp.leftMargin+xOffset,0F,-mlp.topMargin + yOffset,0F);
				break;
			case RIGHT_TOP:
				animation = new TranslateAnimation(0F,mlp.rightMargin - xOffset,0F,-mlp.topMargin + yOffset);
				break;

			case LEFT_BOTTOM:
				animation = new TranslateAnimation(-mlp.leftMargin+xOffset,0F, -yOffset + mlp.bottomMargin,0F);
				break;

			case RIGHT_BOTTOM:
				animation = new TranslateAnimation(0F,mlp.rightMargin-xOffset, 0F,-yOffset + mlp.bottomMargin);
				break;
			default:
				break;
			}

			animation.setFillAfter(true);animation.setDuration(duration);
			animation.setStartOffset(((group.getChildCount()-i) * 100)
					/ (-1 + group.getChildCount()));
			animation.setInterpolator(new AnticipateInterpolator(2F));
			imageview.startAnimation(animation);
		}
	}

}
第四步:PathTestActivity.java以及用到的布局文件main.xml代码如下:
PathTestActivity.java(基本没修改代码)代码如下:
package com.tutor.path;

import android.app.Activity;
import android.os.Bundle;

public class PathTestActivity extends Activity {

    @Override
    public void onCreate(Bundle savedInstanceState) {
        super.onCreate(savedInstanceState);
        setContentView(R.layout.main);
    }
}
main.xml代码如下:
<?xml version="1.0" encoding="utf-8"?>
<LinearLayout xmlns:android="http://schemas.android.com/apk/res/android"
    xmlns:tutor="http://schemas.android.com/apk/res/com.tutor.path"
    android:layout_width="fill_parent"
    android:layout_height="fill_parent"
    android:orientation="vertical" >

    <com.tutor.path.PathMenuView
        android:id="@+id/text"
        android:layout_width="fill_parent"
        android:layout_height="fill_parent"
        tutor:position="right_bottom"
         />

</LinearLayout>
运行点击效果如下:

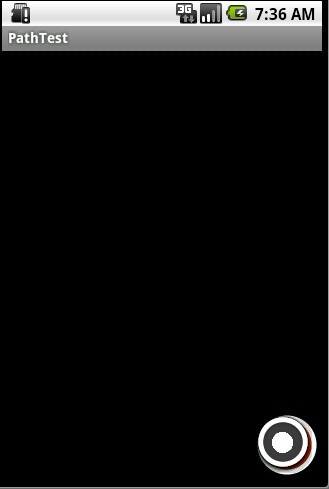
图1:默认是在右下方这里menuResIds定义了五个菜单 图2:点击红色菜单,菜单收回.
下面我们修改main.xml的tutor属性为left_bottom,并且修改PathMenuView.java中的menuResIds.
tutor:position="left_bottom"
效果如下:
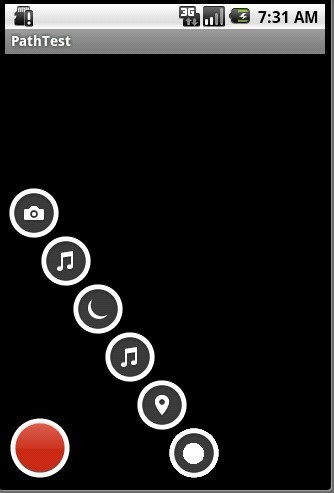
图3:自定义在左下角,六个菜单。
好了,今天就讲到这里了,菜单的圆弧不是很圆哈,凑合着学习,我也来无耻下,如果想要源代码的,可以去我的http://www.yqma.net注册一个用户,并且提一个问题,或者回答一个问题,我会把源代码发到你的邮箱里!谢谢!
分享到:


相关推荐
本篇文章主要主要介绍了Android超仿Path菜单的功能实现,现在分享给大家,也给大家做个参考。感兴趣的可以了解一下。
android 仿Path菜单,具备基本功能。 1、若需要增加item,在xml中添加一个imageview即可,代码会自动按扇形展开 2、可以设置在屏幕的某个角展开 3、可以设置item的单击事件
android仿path菜单,支持:左上;右上;右下;左下;中五个方向进行布局。利用三角函数计算位置,位置更加精准,弧度更加圆滑。
Android SDK (SDK Platforms)-android-31.zip
android PATH菜单实现,简洁 旋转菜单
Android SDK (SDK Platforms)-android-33-ext5.zip
仿Path的弹射菜单效果,可自定义弹射角度和方向,基于Android平台实现
android仿path半圆形菜单
原来PATH的菜单效果如此简单。布局+TranslateAnimation搞定
仿path菜单,支持:左上;右上;右下;左下;中五个方向进行布局。利用三角函数计算位置,位置更加精准,弧度更加圆滑。中间布局时支持半圆形和圆形。
Android 代码,实现path2.0 炫酷的旋转菜单效果,点击主按钮 会在按钮周围弹出一系列小按钮,点击小按钮 所有小按钮 缩回到主按钮位置,动画效果非常绚丽.
Android-react-native-pathjs-charts.zip,基于react native svg和paths js的android和ios图表,安卓系统是谷歌在2008年设计和制造的。操作系统主要写在爪哇,C和C 的核心组件。它是在linux内核之上构建的,具有安全性...
android版的path2.0菜单功能实现源码 path2.0的动态菜单确实很炫,在网上没找的某个大拿自己实现的。感觉效果还可以,就分享出来让大家一起来改进
----------------------------------- Android 编程基础 1 封面----------------------------------- Android 编程基础 2 开放手机联盟 --Open --Open --Open --Open Handset Handset Handset Handset Alliance ...
此为AS工程文件,配套我的博客源代码,讲了用Android属性动画简单的实现Path2.0中的菜单效果,非常简单。
Android Studio Electric Eel 2022.1.1 Canary 2(android-studio-2022.1.1.2-linux.tar.gz) 适用于Linux x86_64系统。 Android Studio版本排序: Electric Eel | 2022.1.1 Dolphin | 2021.3.1 Chipmunk | 2021.2.1...
android 仿path动画菜单lib源码.rar
export PATH=$ANDROID_HOME/bin:$PATH 登录Linux: # mkdir -p /opt/android-sdk/platforms # unzip platform-26_r01.zip -d /opt/android-sdk/platforms/ # mv /opt/android-sdk/platforms/android-8.0.0 /opt/...
前几年的Android应用源码Demo,主要面向的是学生毕业设计学习。
仿Path菜单,底部的左右都可以,可以看一下。